Cyg 30 and 31A & B: Twinkle, twinkle…

Sometimes the simple shots are the most effective.

Cyg 30 and 31A & B

Nice, isn’t it? I like the way the diffraction spikes interact, like a Mondrian painting or something.

What we have here are three stars (in case you didn’t know what a star looks like, or can’t count).

30 Cyg, to the right of the image, is officially a white giant star with a blue tint. Given that I’d describe mine as blue with a white tint, this shows the difficulty in accurately representing colours. There are calibration tools that reproduce scientifically accurate colours, and in fact my software (StarTools) has sophisticated colour processing baked in. But sometimes, well, colour is subjective, as seems the case here. Which begs the whole question: is this art, or science? Is it subjective, or objective? I’ve decided just to avoid the question altogether and admire the pretty pictures.

31 Cyg A is a bright orange giant, with a smaller blue companion called 31 Cyg B. They form a binary system which orbits at a distance of a mere 11 astronomical units (1AU is the average distance from the centre of the earth to the centre of the sun, which is 149.6 million kilometres). As they are viewed side-on, every 10.36 years they are in eclipse for 63 days.

I couldn’t really find much about when the next eclipse will happen, but eventually calculated it’s in February 2024. Which brings up an intriguing notion: if I took one shot like this, every session, for the next three years, then put them together to form an animation, what would I see? Could I really make out Cyg 31 A and B coming closer together and then merging for two months, then separating again?

And to go back to the art v science debate, would this actually contribute anything to science?

31 Cyg’s eclipses have been used in the past to help determine some attributes of orange giants, such as mass and outer atmosphere. I wonder whether, if I did this, it could provide any useful data? Apart from anything however, it would enable me to admire the pretty pictures – all 846 of them (and counting, down…)

M42, Orion’s Nebula, and M35, the Shoe Buckle Cluster

It’s difficult to make Messier 42 look bad. It’s so incredibly photogenic, even just a few quick snaps can at the very least show its astonishing colours and contrasts. The problem is, getting even those few snaps can be beset with problems.

M42, Orion’s Nebula with, above it, the Running Man Nebula and above that, some nice twinkly stars

For once, the UK weather had decided to be kind, and I had an entire evening for photography. Bliss! I can’t remember when that last happened. Given that my previous shoot of the Flaming Star Nebula had gone without a hitch, I was confident that this would too.

How wrong I was. How very, very, sadly wrong.

First problem: run-time error 6 with plate-solving. That was a new one. Plate-solving usually works perfectly. I started looking for fixes (in the garden, in the dark, in the cold) and it seemed a simple case of downloading PlateSolve again and copying it over the old files. Didn’t work. By this time I was starting to turn blue and enter a dark tunnel, so I decided to go indoors and give up.

But I didn’t want to give up. It was supposed to be a full night, and I knew that, if I didn’t fix this, I’d be grumpy all the next day. And nobody wants that.

So, I had another go. I noticed that there were supposed to be two sets of indexes that PlateSolve references, but one of them was completely empty? Why? I dunno. So, I downloaded them and copied them across too. Still no joy.

After a while of staring into the distance and thinking about giving up astrophotography all over again, I suddenly had a thought: PlateSolve needs to know my telescope’s focal length to work properly. Could it be that APT had lost that detail? Indeed it had. One quick type of the focal length later and voila – I had platesolving again.

So, back outside. What is it now? EQMOD error 5.

This time I was prepared. I’ve had that before, and there are two fixes:

  1. Clear EQMOD’s settings and re-specify everything, painstakingly making sure you get latitude and longitude right, and other settings for it to work properly with PHD2.
  2. Copy the backup of all the settings that you made last time this happened.

A quick option 2 later, and that was fixed.

So, can I play yet? Nope. Error 99 on the camera. This is usually terminal. The last time I had it, I needed a new camera. Will it work if I turn it off and on again. Bingo!

And finally, a quick look at the Planewave website to see if there’s anything I should add to PlateSolve. Guess what? A 404 error on their site. I emailed them and it was fixed the next day but would you Adam and Eve it? Four consecutive errors.

This was a cautionary tale. It’s as important to know what to do when things are going right, as it is to fix them when things go wrong. I think pretty much every shoot, something has gone wrong. In fact, nowadays I say to myself, grimly, “Looks like we had our glitch for this mission.”

Still, I got there in the end. M42 came out gloriously, and the Shoe Buckle could do with a bit more exposure time to quell some of that noise.

M35, the Shoe Buckle open cluster

I just wish it looked more like a shoe buckle. I can’t see it. Can you?

First light – and a neat way to plate solve the moon

I’ve taken shots of the moon before with my bargain-basement Bresser Mikrokular camera, but just invested in a T7C camera – a cheapo version of the ZWO ASI120MC.

So, still pretty much bargain basement, but this is mainly for guiding when shooting DSOs, which the Bresser isn’t sensitive enough to do. Mono is usually best for guiding, but I got the colour version so I had the added flexibility of taking lunar and planetary images if I fancied it.

It took a bit of wrestling but I finally managed to get a shot of the moon – 5000 frames captured in SharpCap Pro and stacked and processed in Registax. Nothing too fancy but a good start.

It’s the Moon alright – but which bit? Click for full size.

However, now I’m all over plate solving from my DSO work, it did occur to me: which bit of the moon did I actually capture? Can you plate solve the moon?

Turns out you can’t. The most common advice is to download an atlas and look for it. But, given that I’m very lazy, I found a workaround: use Google’s Image Search.

So, on uploading my image, I get absolutely loads of results back telling me it’s the Sinus Iridum plain.

Sorted! Or, should I say, solved!

It’s so darned clever. It’s almost generalised plate solving: show it any image and it shows you other similar images, which means that it works for pretty much any other kind of astronomy image too.

So, you can’t solve the moon, but you can ask Google to do the next best thing.

Nerdy stuff:

  • 5,000 frames at 1280×960 resolution
  • Hardware: Sky-Watcher 130PDS scope (F5), Sky-Watcher NEQ6 mount, T7C camera with Meade 3x Barlow
  • Software: capture with SharpCap Pro, stacking and post-processing in Registax, plate solving using Google!

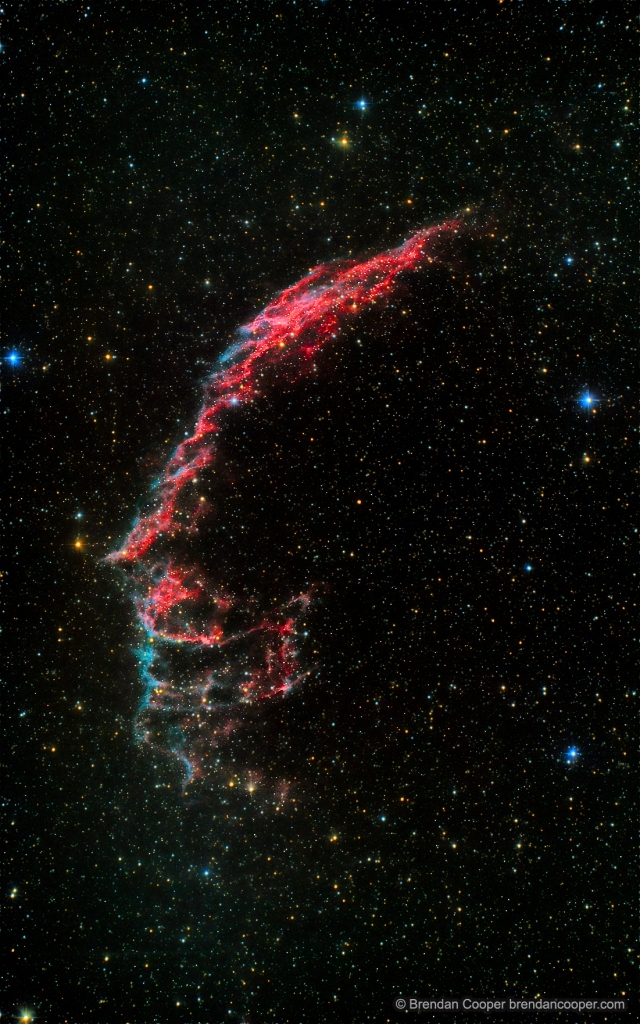
NGC 6992, the Eastern Veil Nebula: Alien or evil grin? (or just a nebula?)*

Do a quick search and you’ll find two popular views of the Veil Nebula: the Eastern Nebula, and the Western. They’re very photogenic. The Western Nebula is also sometimes called the Witch’s Broom Nebula, while the Eastern Veil… isn’t really called anything. It’s only ever really referenced by its catalogue which is Caldwell 34. Mr Caldwell was clearly a terribly dull chap.**

I find this odddddd because to my eye it looks exactly like a face. Other people have said it looks like an alien from the film franchise, or an evil grin. What you think?

NGC 6992, the Eastern Veil Nebula. Bit scary. Click for full size (even scarier).

I guess most photos show it at a different orientation, which is fair enough, but given that there’s really no ‘up’ or ‘down’ in space, I still think it’s strange that this incredibly evocative object doesn’t have a more vivid nickname.

Anyway, the actual Veil Nebula is quite a large structure in the sky, which is why most people just do the edges. I plan to return to this over the coming months and create a mosaic of the whole thing, which will probably be six panes’ worth.

The post-processing was challenging. That part of the sky is teeming with stars, and it took quite some time before I hit on the idea of using StarTools’s Shrink module. Then, I got feedback from people saying they actually preferred the stars. So, given the choices here – east, west, up, down, stars, no stars – you can see that astrophotography is as much about artistic interpretation as actuality.

Nerdy stuff:

  • 11.5 hours of integration
  • 60 seconds exposures at ISO800
  • Calibration: 25 flats, 25 dark flats, 50 darks, 50 bias
  • Hardware: Sky-Watcher 130PDS scope (F5), Sky-Watcher NEQ6 mount, Canon EOS1000D astro-modded camera with Sky-Watcher 0.9x coma corrector
  • Software: polar alignment with SharpCap Pro, capture with Astrophotography Tool (APT), stacking with Deep Sky Stacker (DSS), post-processing with StarTools and Photoshop CS2
  • View annotated at Astrometry.net
  • View superimposed against the WorldWideTelescope

* It’s just a nebula
** Maybe it went something like this: “I say Caldwell old chap, what are you going to call it then?” “Errr… 34?” “Dashed unimaginative, what?”

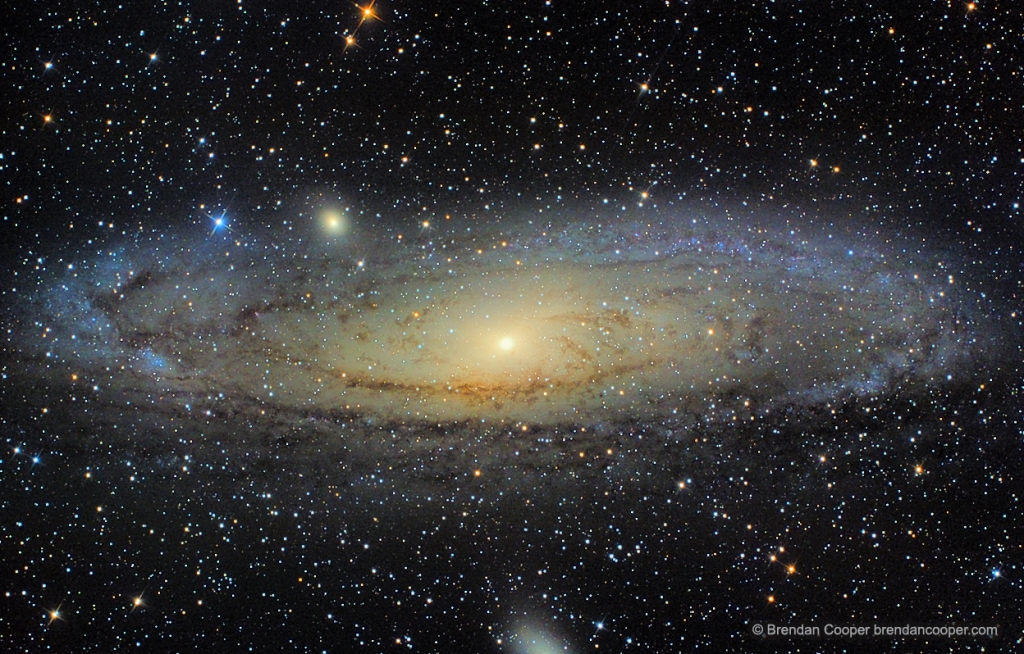
‘The Big One’: M31, the Andromeda Galaxy

It’s around September time that the M31 photos start appearing. This is because M31 – better known as the rather dramatic-sounding Andromeda Galaxy – is nice and high in the Northern Hemisphere. ‘Nice and high’ means that it’s directly above you, so there’s a lot less atmosphere to fight through. Atmosphere distorts images, so the less atmosphere, the clearer the image. If you shoot objects near the horizon, you can be imaging through the equivalent of up to four atmospheres!

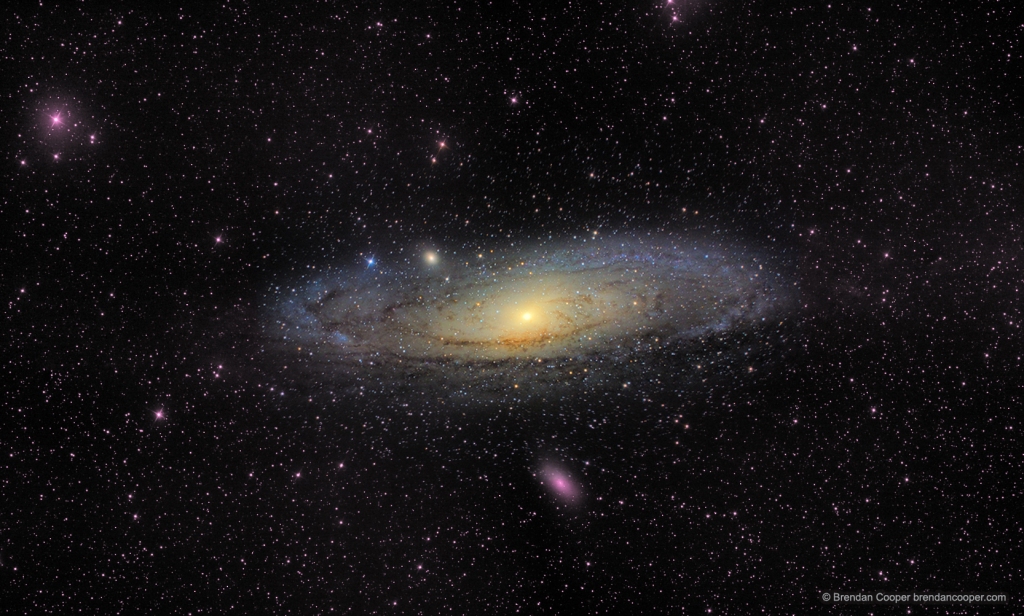
Given that the weather in my bailiwick has been uniformly awful for the past two months, I spent a lot of time planning not just one, but two shoots for Andromeda. One was to gather as much information as possible about the galaxy itself; the other was to do a four-pane mosaic of the space around it, because it’s a view I hadn’t really seen done too often. Andromeda is actually huge, with the full object taking up around six moons’ worth across the sky (Phil Plait explains this well over at Bad Astronomy). This is why most shots are just of the object itself.

Fortunately the weather did actually open up around mid September, and I was able to do several nights’ worth. Given that I’ve only really been doing this ‘properly’ for a few months, I did a little dance when Andromeda started appearing on my laptop screen as the images started to come through.

So, here they are…

M31, the Andromeda Galaxy. Click for full size.
M31, the Andromeda Galaxy, plus surrounding area. Click for full size,

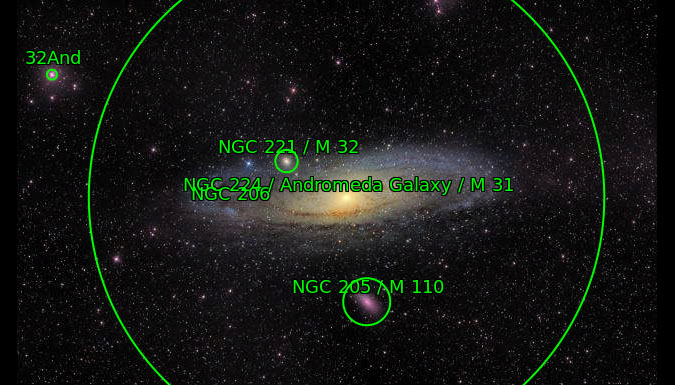
I didn’t know it at the time, but Andromeda actually has at least 13 satellite galaxies, the largest of which is M110, visible just below M31. I seem to have inadvertently captured another three of them, as you can see when I submit the image to the rather wonderful Astrometry.net

My M31 mosaic according to Astrometry.net

Top tip: on the Astrometry.net page, click the link that takes you to the image superimposed against the WorldWideTelescope – it’s amazing. In fact, Astrometry.net is amazing. It’s the basis of a lot of today’s software that does plate solving: that is, show it an image, and it’ll tell you exactly what you’re looking at. Very handy when you can’t actually see it in the sky, even when it’s six moons wide!

Nerdy stuff:

  • 9.5 hours of integration
  • 60 seconds exposures at ISO800
  • Calibration: 25 flats, 25 dark flats, 50 darks, 50 bias
  • Hardware: Sky-Watcher 130PDS scope (F5), Sky-Watcher NEQ6 mount, Canon EOS1000D astro-modded camera with Sky-Watcher 0.9x coma corrector
  • Software: polar alignment with SharpCap Pro, capture with Astrophotography Tool (APT), stacking with Deep Sky Stacker (DSS), post-processing with StarTools and Photoshop CS2
  • View annotated at Astrometry.net
  • View superimposed against the WorldWide Telescope

M81, Bodes Galaxy: Yes, you can image DSOs with an AZ mount (but don’t freeze your laptop)

This was probably the first image I was pleased with. It was also my first all-night session, in March 2020. It’s also the one where I froze my laptop – as in, literally froze it.

It’s M81, the Bodes Galaxy, with M82, the Cigar Galaxy.

M81 and M82. Click for full size.

It was one of my last captures with my old Sky-Watcher 130P AZ mount. I had replaced the OTA with a 130PDS, but was still using the mount. It’s a great starter set-up, but the AZ mount is not really suitable for DSO image capture.

Alt-Azimuth mounts are great for observing. They’re just up/down/left/right – easily understandable. You just point. And if you have a Goto, it will then track that object.

However, while AZ Goto mounts follow objects across the sky, they don’t rotate with those objects. An object will rise in the East, rotate as it moves across the sky, and then set in the West, and all the while, the image you capture from the AZ mount will show that rotation. So, when you come to stack all those images, you find that all the stuff around the edges isn’t really usable. It’s called field rotation.

They’re also not terribly accurate. They’re more intended for viewing than imaging, so absolute pin-point accuracy isn’t as important.

That’s where Equatorial (EQ) mounts come in. They track objects precisely, and keep the camera oriented to those objects too.

There’s also a cautionary tale behind this shot.

The night was wonderful – clear, not too cold, a great time for me to do my first ever full-on, all night imaging session.

Once I was sure everything was set up right and working, I took myself abed, leaving the heavens to wheel above me and my kit to capture them.

I woke up early, noticed it was a bit parky outside. Frost. Everywhere.

A bit panicky, I ran to the setup. It looked ok but there was frost on the laptop. When I started it, it went ‘crunch’. This is not a good sound for a laptop.

After leaving it on the radiator for while, it then went ‘swoosh’ and did nothing. After a bit longer it started to go ‘whirr’ and showed a message about Windows not starting, but suggesting I could try restoring it automatically.

Against all hope, it turned out my system had in fact been backed up automatically the day before, and I gingerly started the restore process. It actually worked. It actually, actually worked…

And that’s when I bought a box to keep everything in overnight. Well, you would, wouldn’t you?

Nerdy stuff:

  • 7 hours of integration
  • 30 seconds exposures at ISO800
  • Hardware: Sky-Watcher 130PDS scope (F5), Sky-Watcher AZ Goto mount, Canon EOS1000D astro-modded camera with Sky-Watcher 0.9x coma corrector
  • Software: capture with Astrophotography Tool (APT), stacking with Deep Sky Stacker (DSS), post-processing with StarTools and Photoshop CS2
  • View annotated at Astrometry.net
  • View superimposed against the WorldWide Telescope